Topic: Tools for Testing Game Graphics and Quality Assurance
chuckw
Topic Opener
Joined: 2010-03-15, 15:23
Posts: 945  One Elder of Players Location: New York - USA |
Posted at: 2010-12-31, 15:35
This forum topic is intended for the discussion of tips, tools, techniques, etc. that a graphician can use in the development of graphic objects for use in the game.
Well, you get the picture. I see little people.  Top
Top
 Quote
Quote
|
|
chuckw
Topic Opener
Joined: 2010-03-15, 15:23
Posts: 945 One Elder of Players Location: New York - USA |
Posted at: 2010-12-31, 16:32
To start off, I'd like to create a reference tool that one could use when designing buildings and other immovable objects for use on the game board. While the empty_building Blender template contains a very handy reference object for constructing the 3D model, it does not allow testing of the final rendered size and map placement. The tool I would like to create for use would be a png file which contains a 2D grid of triangles that mirrors the one used on the game board (i.e. the maps) and from which the roads are derived. That grid is described in the AboutGeometry document. The test grid would have the same physical scale and edge angles as found in the game. This tool would then provide a handy gauge that could circumvent the need to fire up an actual game as it would require only a 2D graphics editor like GIMP. Conceivably, one could create a square grid in the Blender template to get the angles needed, but the final rendered size would still be guess work. On second thought, a "square" grid would not produce "triangles" would it? So, can someone tell me or lead me to the data I'll need to construct the gauge? Certainly, if another reference method is available, I'd love to learn about it. EDIT: added "second thought" about the square grid Edited: 2010-12-31, 16:38
I see little people.
Top
Quote
|
|
chuckw
Topic Opener
Joined: 2010-03-15, 15:23
Posts: 945 One Elder of Players Location: New York - USA |
Posted at: 2010-12-31, 17:29
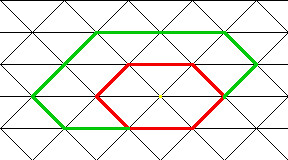
After giving this idea of the gauge a little more thought and reading the AboutGeometry document closer ;), I am creating the gauge image as follows: The document states the sides of the triangles are equal to one another and have a value of 1 which is then multiplied by a factor of 64 pixels. Now the question is how are the roads plotted in reference to this triangular map grid? Does anyone see any holes in this logic? I see little people.
Top
Quote
|
|
chuckw
Topic Opener
Joined: 2010-03-15, 15:23
Posts: 945 One Elder of Players Location: New York - USA |
Posted at: 2010-12-31, 22:52
Here is the result, to scale, of the approach I outlined above: This seems to be confirmed when I overlay a screen capture from the game. I see little people.
Top
Quote
|
|
kingcreole
Joined: 2010-12-18, 11:13
Posts: 93  Likes to be here Location: germany |
Posted at: 2011-01-01, 22:26
hey cool ^^ so how will we use it inside blender? we could add it to a 40% transparent and 100%translucent plane infront of the camera...if we could only animate renderability in blender 2.49b xDDD (sry bout that, maybe some script could work. we could add it as a standard bg-image from camera-view... when rendering it doesn´t show up and when being in shaded mode it too doesn´t but once you switch to wireframe view you can see it...) we could add that grid as a mesh too, maybe close to the camera. we then select it and in wireframe view we can see prety clearly if the model is sized correct... (another thought would be to let it snap to the ground plane from camera view and then look from the top ^^) live is my dancefloor as long as my lag works
Top
Quote
|
|
SirVer
Joined: 2009-02-19, 14:18
Posts: 1445 One Elder of Players Location: Germany - Munich |
Posted at: 2011-01-03, 14:53
That is a terrific idea and some excellent work, chuck! Wonder why I didn't think of it
Top
Quote
|
|
chuckw
Topic Opener
Joined: 2010-03-15, 15:23
Posts: 945 One Elder of Players Location: New York - USA |
Posted at: 2011-01-03, 16:41
kingcreole wrote:
The existing blender templates (empty_building_template.blend and empty_worker_template.blend) in the media repository contain a "trim" object that gives a 3D outline representing the view of the camera. By making the trim layer visible and/or opening a 3D window with the camera view, the artist can keep his mesh within the limits of the camera's field of view while working in Blender. It is not until a 2D frame is rendered however, that a precise cropping and scaling of the image can be performed. That is where this gauge is intended to be used, i.e. as a transparent 2D layer that can be superimposed over an image in a 2D graphics editor to determine if the object will extend over any roads when added to a map or built on the game board. You might think of it as a land survey showing the property lines of the construction site. (We don't want to build our house so large that it ends up in the middle of the street. That could cause trouble with the local building inspector if not the traffic police!! Besides, our carriers might rebel if we make them walk into the side of buildings all the time. They may make it appear painless, but YOU try it!) Hope that clears things up. I see little people.
Top
Quote
|
|
chuckw
Topic Opener
Joined: 2010-03-15, 15:23
Posts: 945 One Elder of Players Location: New York - USA |
Posted at: 2011-01-31, 20:31
FYI - SirVer has been kind enough to provide a lua script that gives the ability to place a specified building(s) (populated with workers) onto a game board while running in debug mode. This will be useful for testing 2nd and 3rd-generation buildings without the need to go through constructing prerequisite buildings and ensuring availability of appropriate workers. I see little people.
Top
Quote
|
|
SirVer
Joined: 2009-02-19, 14:18
Posts: 1445 One Elder of Players Location: Germany - Munich |
Posted at: 2011-02-01, 10:10
My pleasure, chuck. Glad to be of service from time to time.
Top
Quote
|
|
chuckw
Topic Opener
Joined: 2010-03-15, 15:23
Posts: 945 One Elder of Players Location: New York - USA |
Posted at: 2011-03-10, 15:37
New terrain palettes can now be found in the widelands media repository as of rev#150. Here is how I would use them: I see little people.
Top
Quote
|